Table of Contents
A landing page is a standalone web page, designed to increase sales or generate leads for a business. They capture visitor contact details in exchange for special offers, regular newsletters, or resources such as free eBooks, free courses, etc. Most of the time these visitors come from email, a link in an email, or ads from Google, Bing, YouTube, Facebook, Instagram, Twitter, or from similar places on the web. This is the place where they land first. That’s is why it is called a landing page. In this tutorial, we are going to create a landing page in WordPress the easy way but will surely bring you more leads in 2021.
This is a beginner-friendly, step-by-step guide that anyone can follow. No need for any advanced knowledge about coding or WordPress.
What is the difference between the Home Page and a Landing Page?
The home page is the front page of your website what your visitor will see when they first visit your site. Visitors can surf through your website from the home page. Read your blog posts, learn more about your business or website, explore other pages, browse products, or sign up, and a lot more things. Hope you got the exact idea. There are a ‘lot of things‘ on the home page.
But, on the other hand, the Landing page is designed for a ‘specific purpose’. It promotes a single offer. every part of this page is designed for that purpose only. The main target is to convert visitors into customers. No distractions.
What should I include in a Perfect Landing Page?
There are some common rules in creating Landing pages. (Know the rules well, so you can break them effectively. ;)). But after you built your first landing page you must continually test variations to improve it.
I have added a list of some best examples for a good landing page below. Go to those landing pages and try to get a better understanding.
Below is a list of the most common elements we can use while building a landing page. You may be noticed already in the above examples, how these elements can be used effectively.
- Headline/Sub-headline with a supporting copy
- Header image, animation, or a video
- Form, A strong call-to-action
- Subheading and the benefit-centered supporting copy.
- Social Proof
- Features
- Footer
Hope you got a better idea of designing the perfect landing page now. Let’s dive in and see how to create a landing page in WordPress the perfect way.
The landing page design
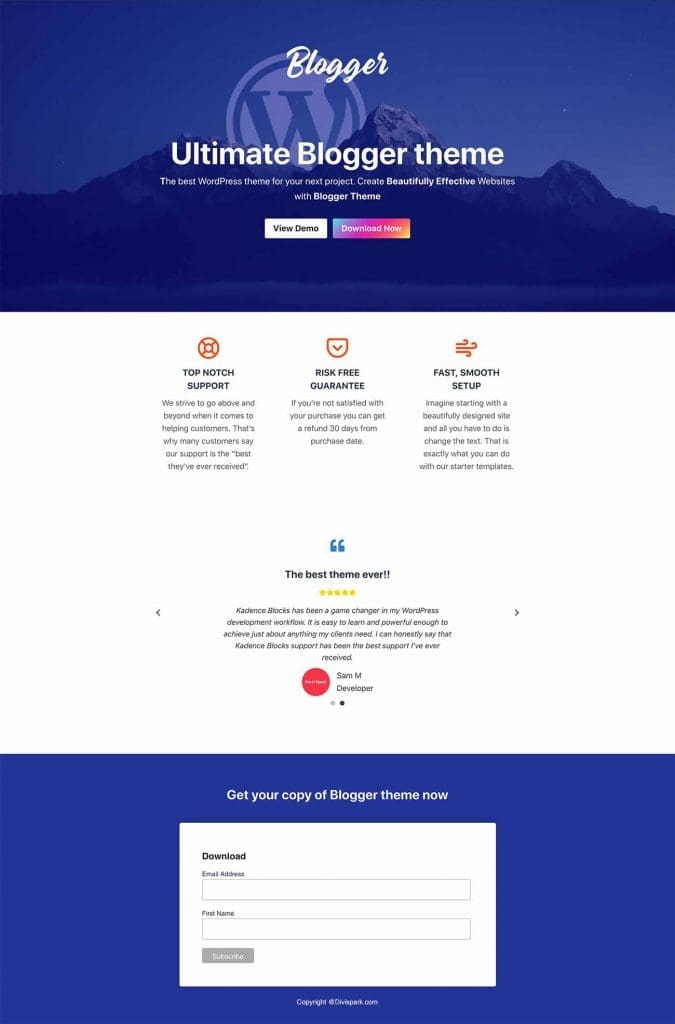
In our demo page, we are forcing the visitor to subscribe to the mailing list and get a free copy of a new WordPress theme called ‘Blogger’. We are going to achieve the result/ build the email list with a simple landing page. With some basic elements: The title with Just a few words and a supporting copy, 3 column features section, Testimonial slider, a subscription form, etc. Pretty straightforward. This simplicity makes it easier for the visitor to get started/subscribe.
Install the WordPress theme
In this tutorial, I am using a free WordPress theme called Kadence. This is one of the best free themes I have ever used for a website. Personally, most of the time I use this theme for my sites. So there’s no problem recommending this to you.
Once you got to the site just click the Free download button on the menu. You will get a zip file that you have to upload to your website.
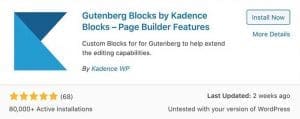
Once you installed the Kadence theme, the next step is to install the plugin. Go to Plugins > Add New and search for Kadence Blocks. Once you found it install and activate to add some great additional blocks to the default Gutenberg blocks library which we can use to design our page.
Create the landing page in WordPress
As you can see Kadence is a well-optimized WP theme with a lot of premium features for free. Let’s start to build our page. Go to the Dashboard > Pages > Add New and create a new page and give it a name. Below is what it looks like on the page editing screen.
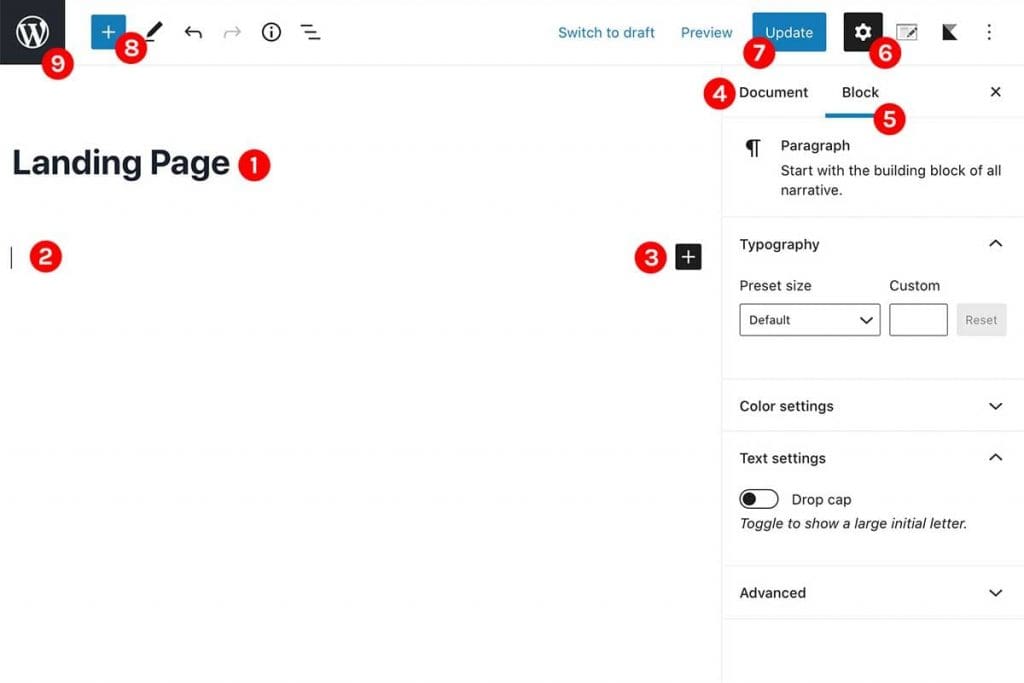
- Page title
- Page content area
- ‘Add Blocks’ button
- Document settings/Page related settings
- Settings related to the specific block
- Show/Hide settings panel
- Publish or Update button
- Add Block button
- Back button
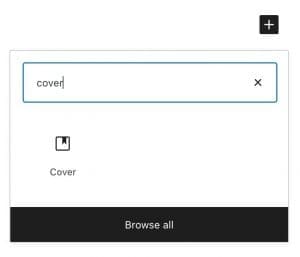
Let’s start by adding a cover section and then the logo, the title, the supporting copy, and two buttons (One button will show the demo installation of the theme and the other button will simply scroll to the bottom form which they can subscribe immediately and get a copy of the theme).
Click on the Add block button on the right corner of the page. Then select ‘Cover’ from the list. You can use the search function here to find the block you want.
Below is what I did in my version
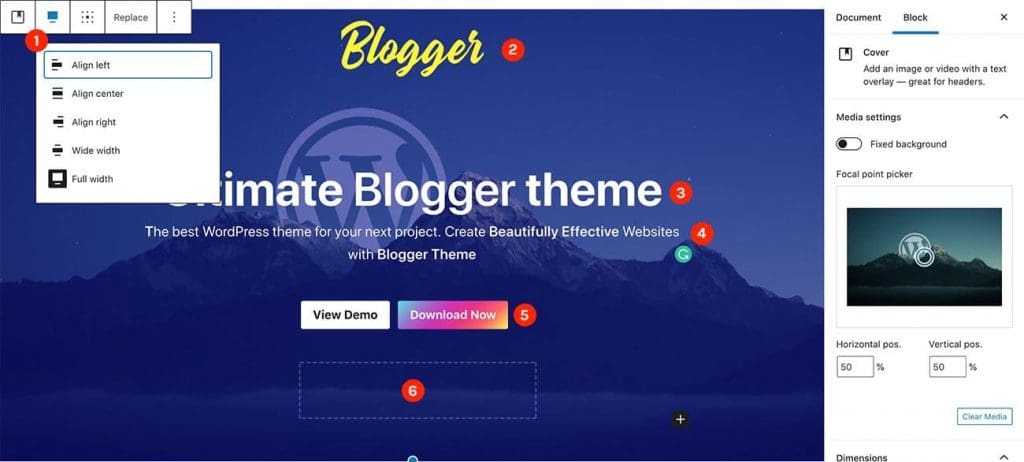
- Make this a full-width section with this option.
- The logo. I have added an ‘Image Block’ here and uploaded the logo.
- The title. Here I have added the ‘Advanced heading block’ which comes with the Kadence Blocks plugin.
- Regular Paragraph Block
- Call to action buttons. Here I have added two buttons with a regular ‘Buttons’ block. Once for the theme demo and one which will redirect to the bottom form.
- Spacer Block. I added some space here to make the design a bit cleaner. You can use Spacers anywhere to add some space.
Set the page template
There is another important thing, The page template. If you had a look at the front end now you will see the page layout is not what we expected. It has the header, sidebar, page title bar, footer, etc. But for the landing page, we need a clear canvas. No need for the header, footer, etc. We do not need to give an option to the visitor to go out of the landing page. That’s why we avoid all other links. To alter the page layout there is an option that comes with the Kadence theme. Click on the page settings button next to the Publish/Update button to remove those unwanted elements from our page.
- Show/hide Page settings
- Enable transparent header. We can just ignore this as we are doing to disable the header.
- Page Title. Disable the page title bar
- Page Layout. I am using the NARROW as I want to make the inner page content to be less wider.
- Content Style. Use what you prefer. See the difference in each option yourself.
- Content vertical padding. This will remove the vertical padding on the top of the page and the very bottom.
- Show Featured Image. As we no need to show that, just disable it.
- Disable header
- Disable footer
Once you set those, have a look at the front-end.

That’s pretty much like what we wanted. right? 🙂
Add features sections to the landing page
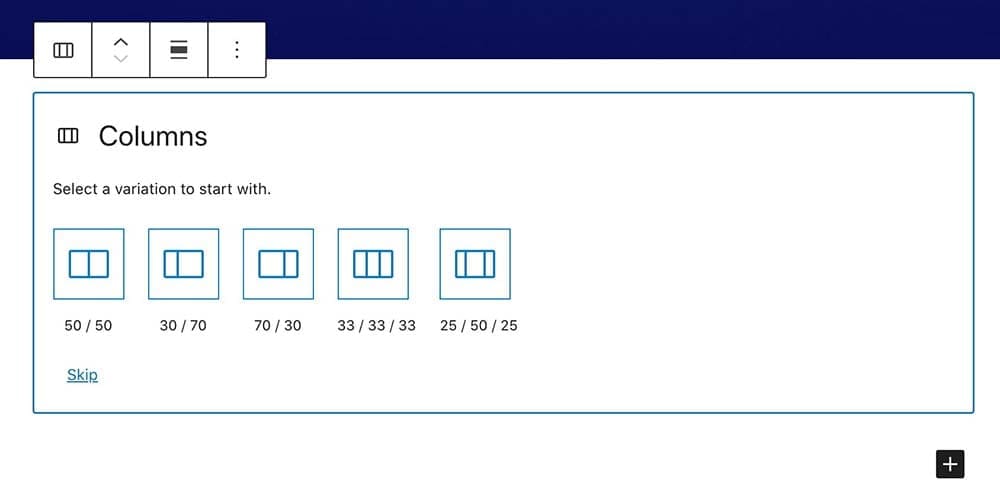
Now we are going to add our features section. Let’s start by adding 3 columns. Click on the black ‘+’ icon and search for ‘columns‘. And select the 3 columns layout(33/33/33) on the next screen.
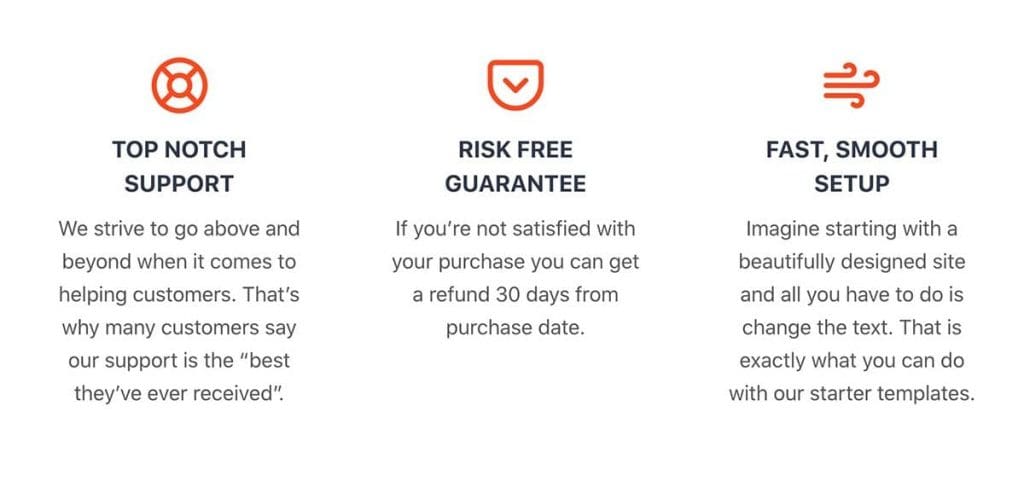
Then add ‘Info Blocks’ in each section. Info Block is something coming with the Kadence Blocks plugin.
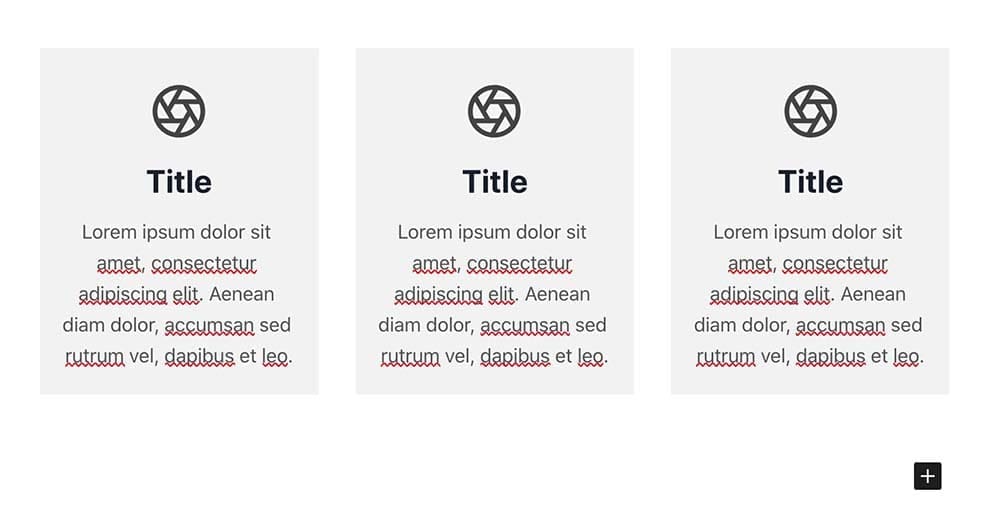
Just go ahead and design the section the way you want it to be. Below is what I did in my version.
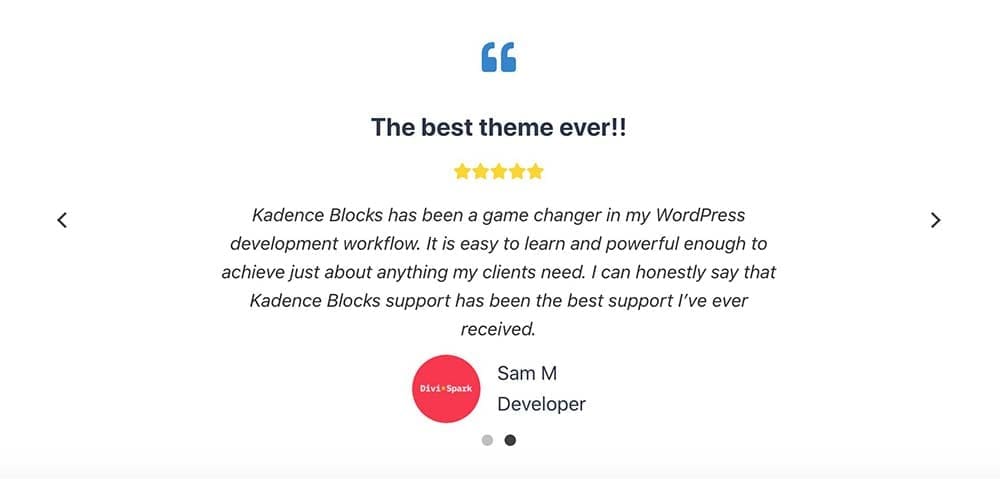
Add the testimonial slider
With Kadence it is really easy to add a testimonial slider to your page. Just search for it and add it to the page. You can use this as just testimonials or as a slider/carousel. Here, in my version, I am using the carousel mode as you can see below. Just play on the settings panel and try to do the section you want.
Create the CTA/Subscription form
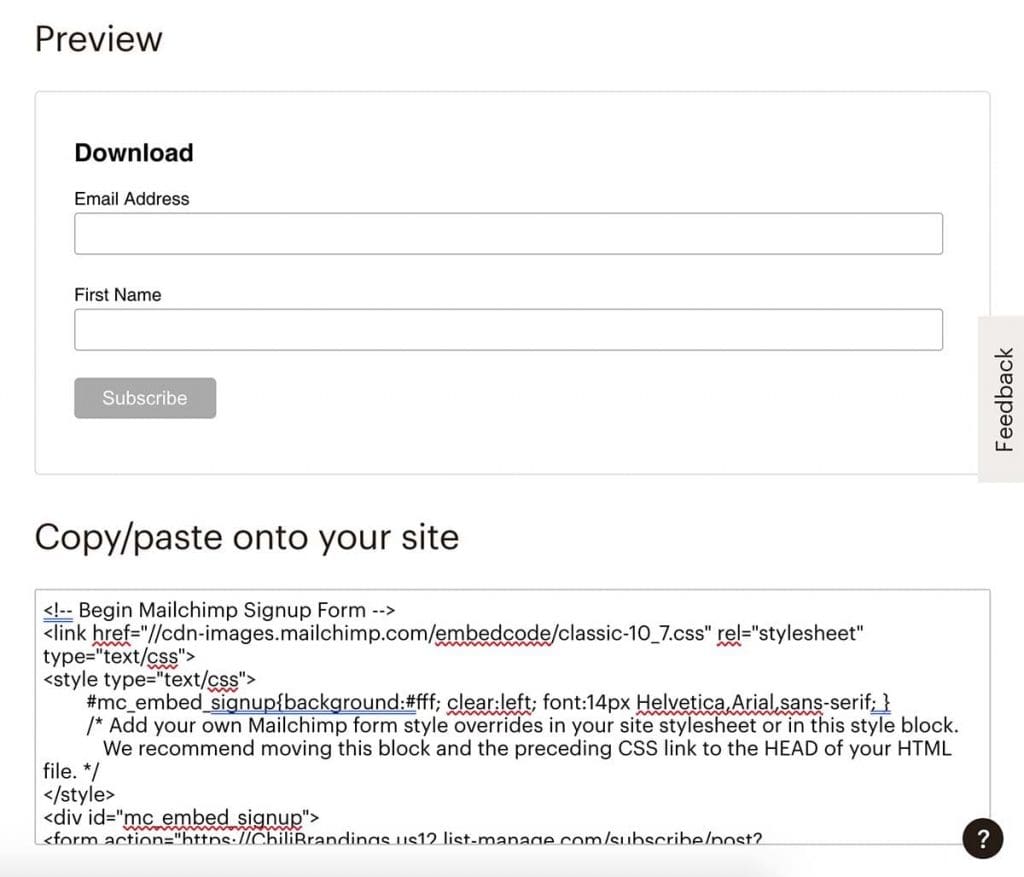
Let’s create the call to action section with a simple form to enter the name, the email, and subscribe/download button. Here our plan is to build our email list. There are a few methods of adding a form to our landing page depending on your needs. But we are not going to use just a simple contact form here. Instead, we are going to use a subscription form from an email marketing platform like MailChimp, Aweber, Constant Contact, etc.
First login to your email marketing service. Select your email list and create an embed Signup form. For that, I am going to use MailChimp here in my tutorial.

Create your form and copy the embed code.
Add the subscription form to the page
Go to the page and add a ‘Row Layout’ block. This is also something coming with the Kadence Blocks plugin.

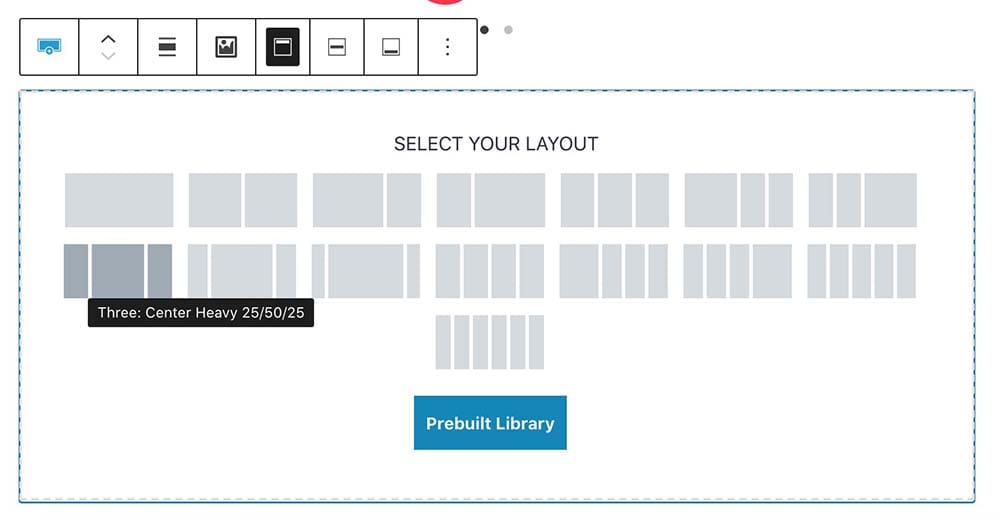
I am using the bottom left layout for the CTA section. Choose something you like here. As you can see in the settings box, we have a lot of options to make this looks nicer.
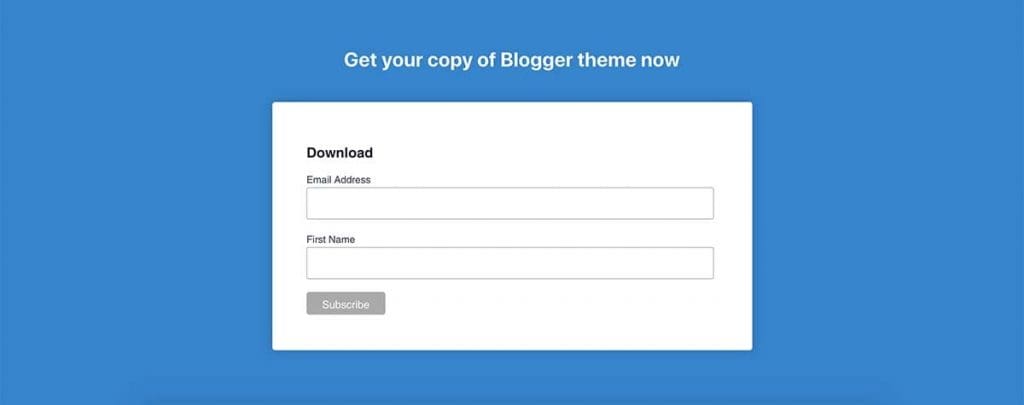
Add an HTML block and paste the code inside we just copied from MailChimp. Below is what I did. (I have added another row layout on the top with a single column to insert the header text. Btw both of them are full-width sections.)
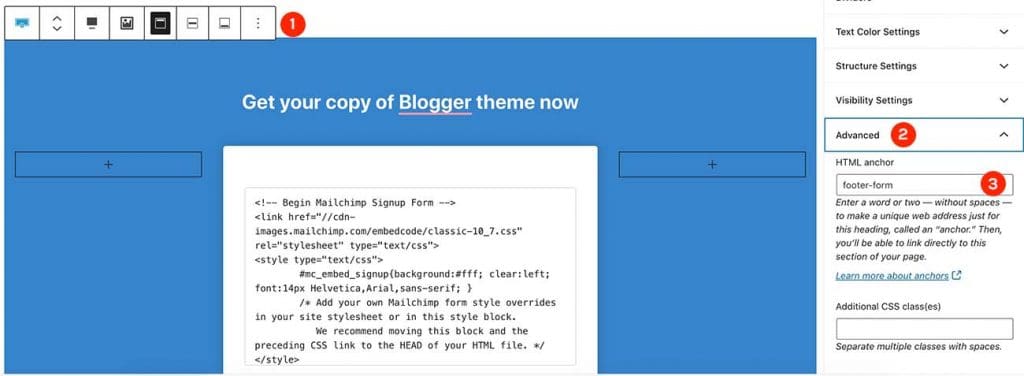
We are almost done with our landing page design in WordPress. But there’s an important thing to do now. Let’s link our top call to action button to the bottom form. So when someone clicks on the ‘Download’ button it will scroll down to the footer section with the form.
First, go to the bottom Row Layout Settings > Advanced and add the HTML anchor text there.
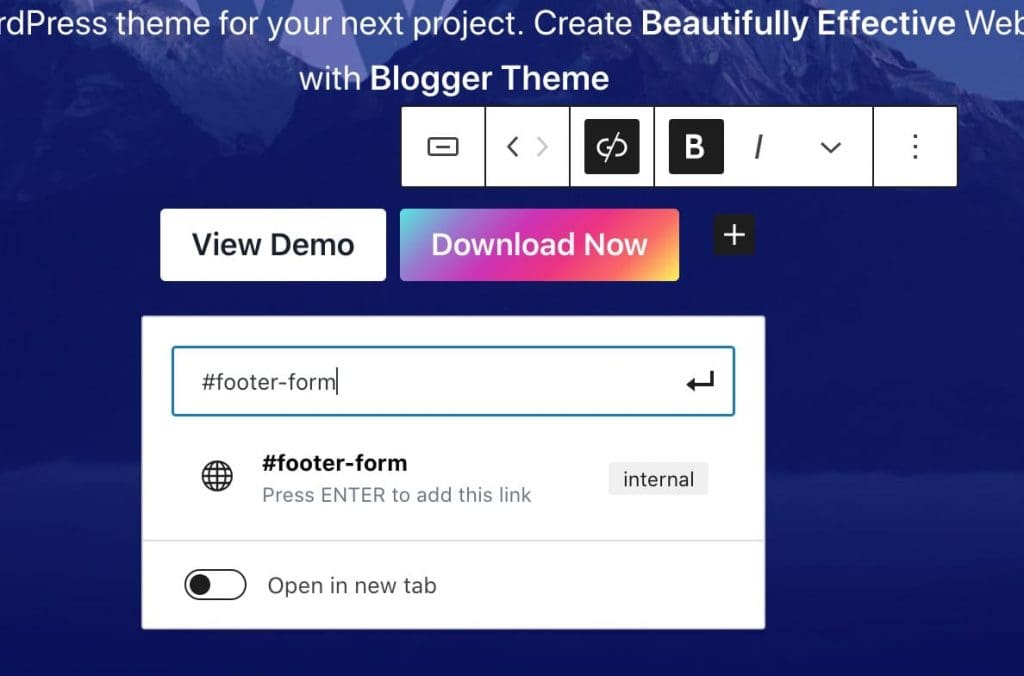
Now go back to the top cover section and add the button link as #footer-form with the hashtag in front of the anchor text.
Below is the landing page we created in WordPress. Use your own creativity and best practices to build the perfect landing page which actually brings you more customers/leads. Do not stop by just pushing it. Try different methods to improve from time to time and see how those changes affect the result.
That’s how to create a landing page in WordPress. If you think this article is helpful please share. So someone else can get the benefit too! Good luck!